https://assetstore.unity.com/packages/tools/integration/opencv-for-unity-21088?aid=1101lvqJ5
사람 얼굴을 인식하고 얼굴에서 감정 값을 추출해 내기 위해 사용한 에셋
2021LTS버전에서도 가능
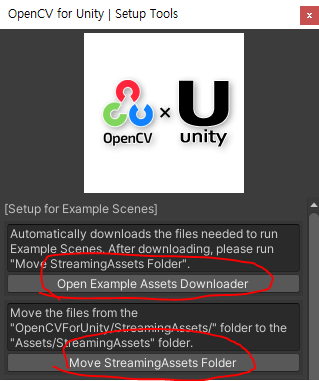
에셋 임포트 후에는 OpenCV for Unity에서
'Open Example Assets Downloader'
'Move Streaming Assets Folder'를 눌러서 필요한 파일을 다운로드 하고 폴더를 옮겨주어야함.
인식되는 감정 값(float)을 가져오려면 Quad오브젝트에 있는
'Facial Expression Recognition Example'에서 가져와야함

public virtual void visualize(Mat image, List<Mat> results, Mat faces, bool print_results = false, bool isRGB = false)
하단이 이 함수에서 가장 잘 나온 감정의 결과값만 뽑아서 화면상에 그리드와 감정이름(label) 감정 값(float)을 보여준다
ClassificationData라는 구조체?가 있는데 이 구조체로 된 핵심 함수가 2개 있음
getData, getBestMatchData라는 함수
이 2개 함수에는 인자 값으로(results)라는 값을 넣으며 results는 배열 구조임(총 6개의 감정 데이터)
0.angry
1.disgust
2.fearful
3.happy
4.neutral
5.sad
6.surpsied
ex)
getBestMatchData(results[0]) => return ClassificationData((int) label, (float) value) => (0, 0.9912) => angry, 0.9912
ex)
getData(results[i])[0].conf => angry의 밸류 => 0.9912
getData(results[i])[0].cls => angry의 라벨 => 0 (int로 저장된 순서값)
*public virtual void visualize(Mat image, List<Mat> results, Mat faces, bool print_results = false, bool isRGB = false)
이 함수안에 반복문에서 밑에 코드 참고해서 쓰면 됨
                    Debug.Log(getData(results[i])[0].conf);
                    Debug.Log(getData(results[i])[0].cls);

                    Debug.Log(getBestMatchData(results[i]).cls);
                    Debug.Log(getBestMatchData(results[i]).conf);

                    Debug.Log("Angry : " + getData(results[i])[0].conf);
                    Debug.Log("Disgust : " + getData(results[i])[1].conf);
                    Debug.Log("Fearful : " + getData(results[i])[2].conf);
                    Debug.Log("Happy : " + getData(results[i])[3].conf);
                    Debug.Log("Neutral : " + getData(results[i])[4].conf);
                    Debug.Log("Sad : " + getData(results[i])[5].conf);
                    Debug.Log("Surprised : " + getData(results[i])[6].conf);
사람 얼굴 하나만 인식 시키기
Facial Expression Recognition Example에서 수정
밑에 쯤에 public virtual void visualize(Mat image, List<Mat> results, Mat faces, bool print_results = false, bool isRGB = false) 함수에서
 for (int i = 0; i < results.Count; ++i)
                {
                    if(i == 0)
                    {
                        float[] face_box = new float[4];
                        faces.get(i, 0, face_box);

                        ...
for 반복문 안에 'if( i == 0)'을 조건문을 추가하고 안에 내용을 넣음.
results.Count를 1로 바꾸면 카메라 앵글에서 얼굴을 놓쳤을때 화면이 얼어버리게 됨.
이렇게 하면 얼굴 분석 박스가 1개만 나오지만 실제로는 모든 얼굴을 분석중인거라 연산 자체가 가벼워지지는 않음.
disgust 값을 angry로 사용하기
disgust랑 angry랑 일반적인 표정인식에서 큰 차이가 안나고 화난 표정을 지으려고해도 disgust로 넘어가버려서 그냥 통합.
마찬가지로 Facial Expression Recognition Example스크립트의 public virtual void visualize함수에서 수정
생략...
	ClassificationData bmData = getBestMatchData(results[i]);
	int classId = (int)bmData.cls;

	string label = getClassLabel(bmData.cls) + ", " + String.Format("{0:0.0000}", bmData.conf);

	//수정한 부분(추가한 부분)
	if(classId == 1)    //Disgust가 나왔다면 label의 이름 수정(0을 입력해서 angry가 나오게함)
	{
	    label = getClassLabel(0) + ", " + String.Format("{0:0.0000}", bmData.conf);
	}

	Scalar c = palette[classId % palette.Count];

	//수정한 부분(추가한 부분)
	if (classId == 1)    //Disgust가 나왔다면 분석 박스의 색깔을 수정(0을 입력해서 angry 분석 박스의 색깔이 나오게함)
	{
	    c = palette[0 % palette.Count];
	}

	Scalar color = isRGB ? c : new Scalar(c.val[2], c.val[1], c.val[0], c.val[3]);
생략...
classId가 1일때 즉, disgust가 나왔을때 angry의 classId값인 0을 대입.
label에서 disgust를 angry글자가 나오게 바꿔주고
분석상자 색깔값인 c도 마찬가지로 수정해줌
코드 수정해서 수동으로 카메라 지정할수 있는 기능 넣기.
아마 인식되는 카메라가 1대면 별도로 지정할 필요가 없지만, 카메라가 여러대면 카메라의 디바이스이름이나 인덱스 번호를 에디터의 Inspector에서 입력해주어야함.
카메라가 1대일때는 디바이스이름이 null상태여도 됨.

빌드했을때도 수정할수 있게 인터페이스로 만들려고함.
WebCamTextureToMatHelper스크립트에서 수정.
public static string SavedCamName; //저장된 카메라 디바이스 이름외부에서 값을 정할 용도로 static string으로 만듬
*외부에서 참조하려면 using OpenCVForUnity.UnityUtils.Helper; 필요
575line쯤
			//추가한 코드
            requestedDeviceName = SavedCamName;


            // Creates the camera
            var devices = WebCamTexture.devices;
            if (!String.IsNullOrEmpty(requestedDeviceName))
            {
                int requestedDeviceIndex = -1;
                if (Int32.TryParse(requestedDeviceName, out requestedDeviceIndex))
                {

                ...생략
디바이스 호출하는 코드 바로 이전에
requestedDeviceName = SavedCamName;를 작성해줌
외부 스크립트에서 WebCamTextureToMatHelper.SavedCamName만 지정해주면 됨.
스튜디오 오버그래픽스
정준희 Technical Artist
ovgrps@gmail.com
'작업 기록' 카테고리의 다른 글
| Google Magenta 로컬 설치 및 실행 방법 (5) | 2025.07.31 |
|---|---|
| '2D Video' To '3D Stereo Video' AI 구동 방법(Tencent AI Lab - StereoCrafter) (0) | 2025.05.10 |
| NDI,OSC 네트워크 이슈 (0) | 2022.07.14 |
| rsvfx에서 빌드 오류 (0) | 2022.03.14 |
| rsvfx에서 UnityEngine Namespace 오류 (0) | 2022.03.13 |